
Now that we’ve learned the history of the camera obscura, let’s make our own!
Ahora que hemos aprendido sobre la historia de la cámara oscura, ¡construyamos la nuestra!
I am text block. Click edit button to change this text. Lorem ipsum dolor sit amet, consectetur adipiscing elit. Ut elit tellus, luctus nec ullamcorper mattis, pulvinar dapibus leo.
UCR ARTS for Kids: Make Your Own Camera Obscura
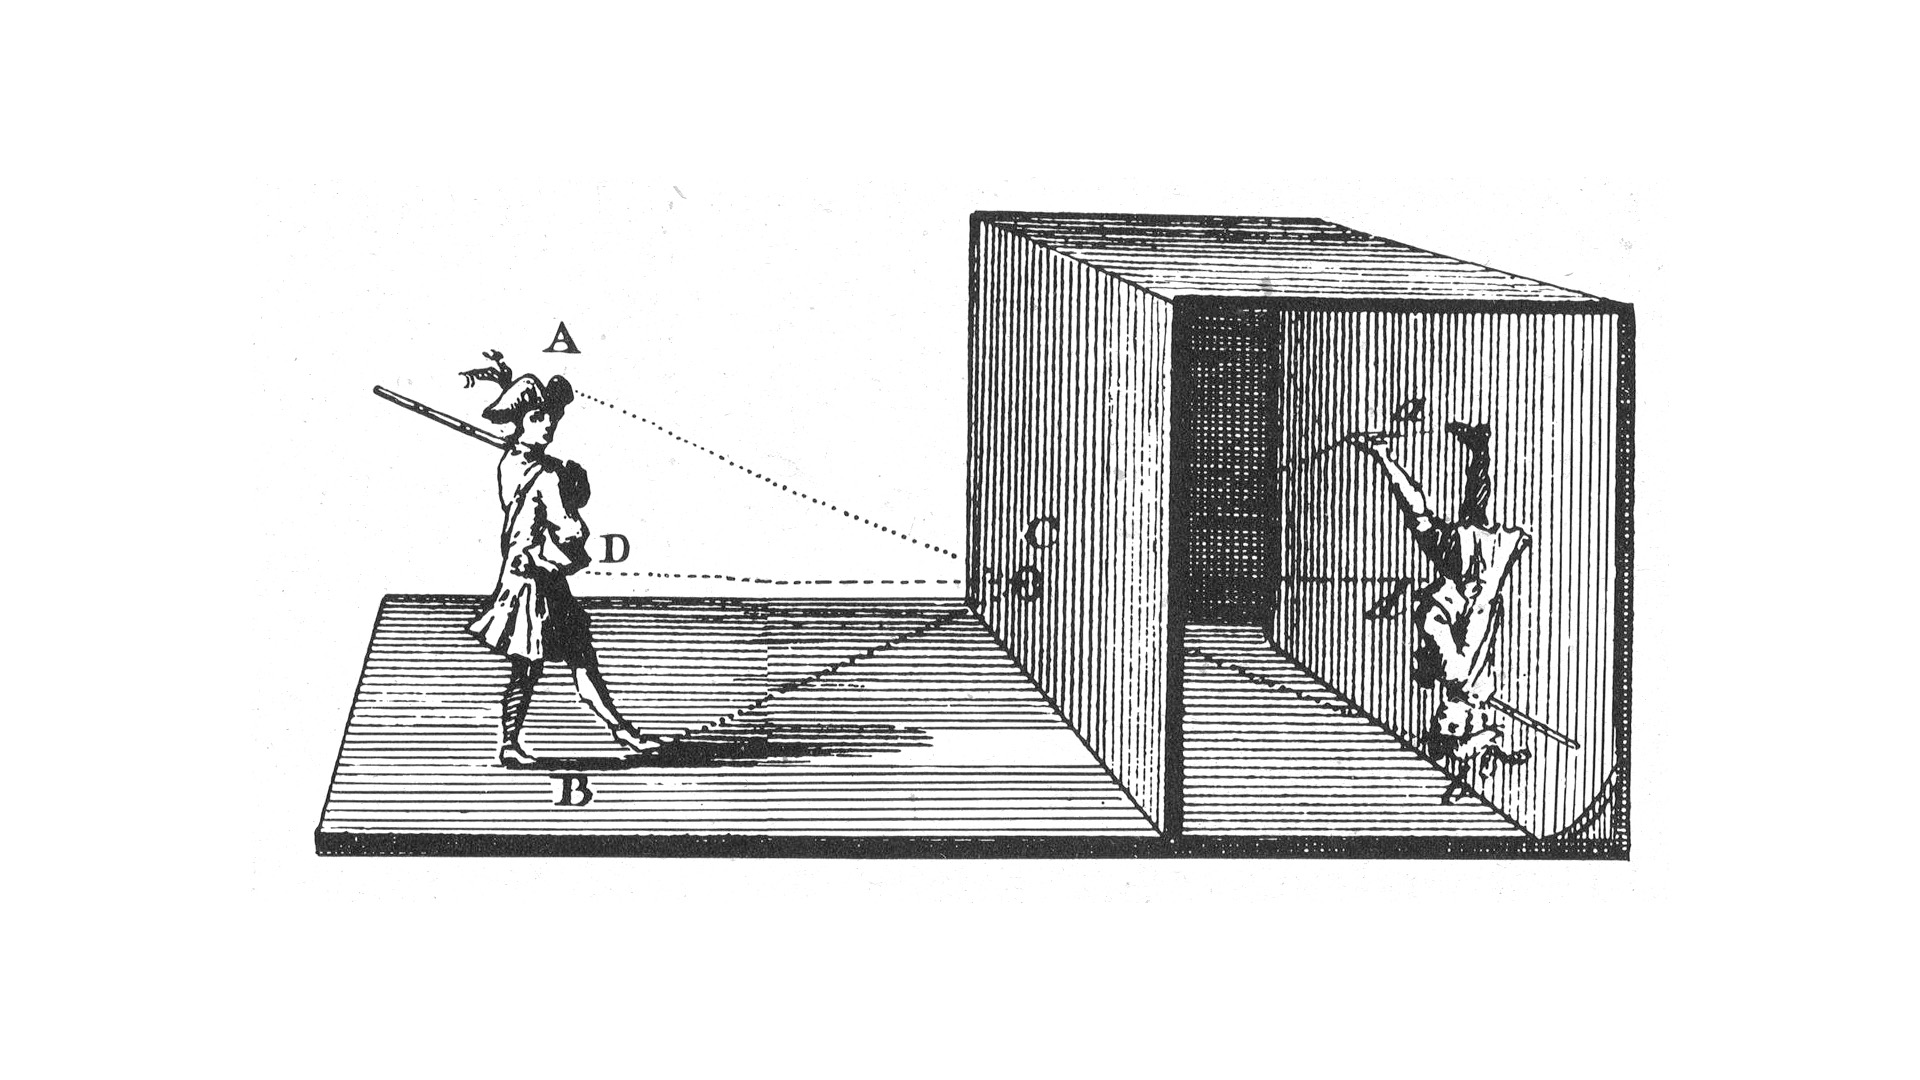
Now that we’ve learned the history of the camera obscura, let’s make our own! Inventors long ago made a smaller, portable version of the camera obscura out of a box just like you will! This is also called the pinhole camera.
Now let’s talk briefly about how the pinhole camera obscura works. If it’s hard to understand, don’t worry! Making the camera obscura will help you understand it!
The box acts as a smaller version of the dark room with a tiny hole in one side. Light will come through the hole and project an image of the outside world on a white piece of paper in the middle of the box. You will look into the box from the back and see the projected image which will appear upside down and reversed! Ready to get started? Awesome!
First, you’ll need to find these items around your house. You will need:
- An adult to help you
- A box of any size
- A piece of translucent white tissue paper or wax paper
- A piece of cardboard that is deeper and taller than the inside of your box
- A hammer
- A nail
- Scissors
- A pen or pencil
- Tape
- Something to use as a straight edge
- Construction paper is optional but be sure to use a dark color
You can pause the video here while you look for them.
- Place your piece of cardboard in the box and mark the depth of the box.
- Cut out your piece of cardboard so that it slides inside the box and the box can be closed.
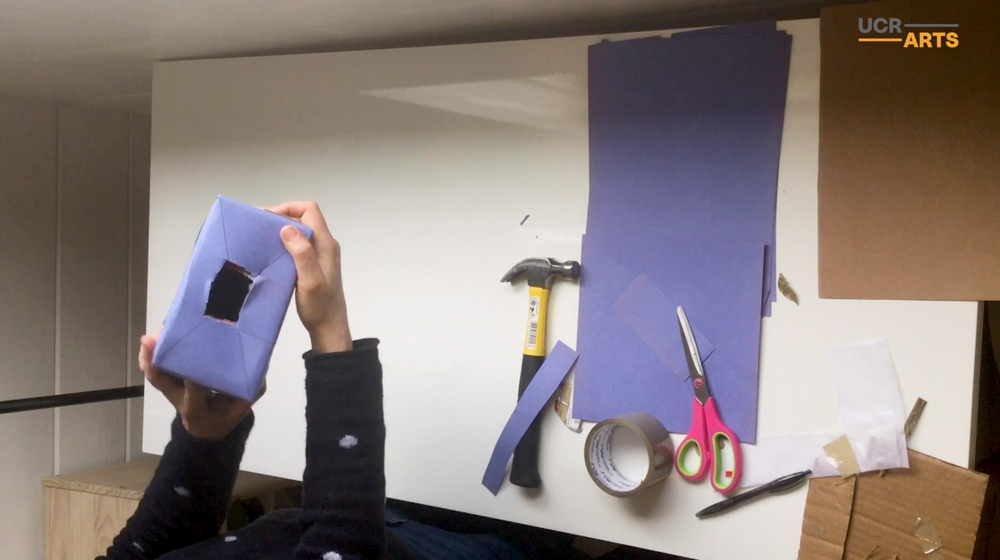
- Have an adult help you cut a square hole out of the inside of the piece of cardboard to create a frame.
- Cut the tissue paper or wax paper to be slightly smaller than the piece of cardboard but larger than the hole.
- Tape the paper onto one side of the frame.
- Slide the frame into the middle of the box. If you place it closer to the side where the pinhole will be, you will have a smaller image.
- My tape added some bulk so I had to trim a little more. Secure with tape.
- Tape the box shut as tightly as you can. You’re trying to keep any light from coming into the box except for when light will come in through the pinhole. Shoeboxes work well because they don’t let much light in but you can use any kind of box.
- If you want, you can cover your box in construction paper. This helps block out more light if your box is thin or has more holes. This is also a good idea if you want to decorate your box! You can use glue or tape to cover the box in construction paper. Glue would probably look better but I only had tape. Sometimes you just have to work with what you have!
- On a smaller end of the box, draw diagonal lines from each corner to make an X with a pen or pencil. Use a straight edge to help you keep the line straight.
- The center of the X is where your pin hole will go. Ask an adult to hammer a nail into the box to make the pinhole. If needed, you can make it a little larger with a pen or pencil but I recommend doing that after you’ve had a chance to try out the pinhole camera.
- Flip the box over to the opposite side. On that side, create another X using your pencil and straight edge.
- The center of this X will be your viewer. Ask an adult to use the scissors to cut a square-shaped hole that is about 2 inches wide and 1 inch tall in the center of the X.
- Now you’re ready to use your camera obscura! Point the pinhole side of the box toward a light. It’s best to point it out a window or go outside during the daytime.
- If the pinhole is small, the image will be dim but sharp. If the pinhole is a little larger, the image will be brighter but blurrier like mine.
- Look inside the viewer to see the world upside down and reversed!
Awesome job! Now you have your own camera obscura.
That was so much fun you guys! Thank you for making a camera obscura with me. Join us again next time to learn about the history of photography and for an activity.
UCR ARTS para niños: Crea tu propia cámara oscura
Ahora que hemos aprendido sobre la historia de la cámara oscura, ¡construyamos la nuestra! Hace mucho tiempo, inventores crearon versiones más pequeñas y portables de la cámara oscura hechas con una caja ¡al igual como lo harás tú! Esto también se llama cámara estenopeica.
Ahora hablemos un poco sobre cómo funciona una cámara estenopeica. Si es difícil de entender, ¡no te preocupes! ¡El construir una cámara oscura te ayudará a entender!
La caja actúa como una pequeña versión del cuarto oscuro con un pequeño agujero en un lado. La luz pasará a través del agujero y proyectará una imagen del mundo exterior sobre una hoja de papel blanco ubicada en medio de la caja. Mirarás en la caja desde atrás y verás la imagen proyectada que aparecerá ¡de cabeza y al revés! ¿Listos para empezar? ¡Genial!
Primero, debes buscar estos materiales en tu casa. Necesitarás:
- A un adulto que te ayude
- Una caja de cualquier tamaño
- Un trozo de papel trasluciente o papel encerado
- Un trozo de cartón que sea más profundo y más largo que el interior de tu caja
- Un martillo
- Un clavo
- Tijeras
- Un lápiz o pluma
- Cinta adhesiva
- Algo para usar como borde recto
- La cartulina es opcional, pero asegúrate de usar un color oscuro
Puedes parar el video mientras buscas los materiales.
- Ubica tu trozo de cartón en la caja y marca la profundidad de la caja.
- Corta tu trozo de cartón para que se deslice dentro de la caja y la caja se pueda cerrar.
- Pide ayuda a un adulto para cortar un agujero cuadrado en la parte interior de la pieza de cartón para crear un marco.
- Corta el papel o papel encerado para que sea un poco más pequeño que la pieza de cartón, pero más grande que el agujero.
- Pega el papel en un lado del marco.
- Desliza el marco hacia la mitad de la caja. Si lo ubicas más cerca del lado donde estará el agujerito, tendrás una imagen más pequeña.
- Mi cinta adhesiva agregó más volumen así es que tuve que cortarla un poquito más. Asegura la cinta.
- Cierra la caja bien cerrada con la cinta adhesiva. No quieres que pase nada de luz hacia el interior de la caja excepto la luz que pasará por el agujerito. Las cajas de zapatos funcionan muy bien porque no dejan pasar mucha luz, pero puedes usar cualquier tipo de caja.
- SI quieres, puedes cubrir tu caja con cartulina. Esto ayuda a bloquear más la luz si tu caja es muy delgada o si tiene más agujeros. ¡También es una buena idea por si quieres decorar tu caja! Puedes usar pegamento o cinta adhesiva para cubrir la caja con cartulina. Probablemente se verá mejor con pegamento, pero yo sólo tenía cinta adhesiva. ¡A veces debes usar lo que tienes a mano!
- En un lado más pequeño de la caja, dibuja líneas diagonales desde cada esquina para formar una X usando un lápiz o una pluma. Usa un borde recto para ayudarte a dibujar las líneas y que queden derechas.
- El centro de la X es donde ubicarás el pequeño agujero (pinhole). Pide a un adulto que martille un clavo en la caja para hacer el agujero. Si es necesario, puedes hacerlo un poco más grande con un lápiz o una pluma, pero te recomiendo que lo hagas después de probar la cámara estenopeica.
- Da vuelta la caja hacia el lado opuesto. En ese lado, dibuja otra X usando tu lápiz y un borde recto.
- El centro de la X será tu visor. Pide a un adulto que use las tijeras para cortar un agujero con forma de cuadrado en el centro de la X y que sea de alrededor de 2 pulgadas de ancho y 1 pulgada de alto.
- ¡Ahora estás listo para usar tu cámara oscura! Apunta el lado de la caja con el agujerito hacia una luz. Es mejor si apuntas hacia una ventana o si vas afuera durante el día.
- Si el agujerito es pequeño, la imagen será tenue pero nítida. Si el agujerito es más grande, la imagen será más brillante pero más borrosa, como la mía.
- ¡Mira por el visor para ver el mundo de cabeza y al revés!
¡Excelente trabajo! Ahora ya tienes tu propia cámara oscura.
¡Esto fue muy divertido! Gracias por construir una cámara oscura conmigo. Acompáñanos nuevamente la próxima vez para aprender sobre la historia de la fotografía y para hacer una actividad juntos.